
This tutorial is made by me, but with inspiration from other people, it's made for making it easier for people to construct waypoints files for their quakeworld maps, to compete against bots on them. Frogbots are computer opponents with a decent AI.

| KEY | IMPULSE | FUNCTION |
| MOUSE1 | 119 | SPAWN A MARKER |
| O | 120 | TOGGLE MANUAL-MODE |
| N | 125 | CHECK ALL GOALS |
| M | 126 | CHECK ALL ZONES |
| I | 127 | TOGGLE ACTIVE MARKER |
| P | 128 | REMOVE ACTIVE MARKER |
| H | 129 | DISABLE ACTIVE MARKER |
| J | 130 | TOGGLE ONEWAY-MODE |
| MOUSE2 | 131 | TOGGLE CONNECT-MARKERS-MODE |
| G | 132 | DEFAULT MARKER-MODE |
| F1 | 133 | SAVE MARKERS |
| F | 135 | TOGGLE CLOSEST-MARKER-MODE |
| T | 137 | CLEAR ACTIVE MARKER |
| Y | 138 | MOVE ACTIVE MARKER |
| U | 139 | VER?? MOVE ACTIVE MARKER |
| . | 140 | INCREASE GOAL/ZONES |
| , | 141 | DECREASE GOAL/ZONES |
| ENTER | 142 | SET GOAL/ZONE |
| C | 143 | PRINT GOAL |
| V | 144 | CYCLE PATH-MODES - jump ledge-mode - dm6 door-mode - disconnect-mode - reversible display-mode - water path display-mode - rocket jumo mode - path mode OFF |
| B | 145 | DISPLAY TRAVELTIME (don't use) |
| Z | 146 | CYCLE DISPLAY-MODE |
| X | 147 | DISPLAY REACHABLE |

Client: I recommend joequake.exe for the client to use with waypoints, it's pretty stable.
Haven't tried any other clients so can't vouch for them. Remember it's the software version of
joequake, not the fancy GL version.
Frogbot version: Using progs.dat from frogbot v0.85
At last you'll need some patience, because the client WILL crash on you, when doing some wrong
newbie move. I'll try to clear the path for you in this tutorial.

To start with, you should find out what level you wan't to create waypoints for.
(eg. ztndm1)
There is a couple of things that shouldn't be in the map.
Lifts: Well the map can have lifts going up and down but the bots doesn't handle them
very nicely. And lifts that moves horisontal is a no-go, it's therefore there is a special bot version
of DM2 with the lava and big room lifts exchanged with normal brushes.
Water: In the new version of frogbog, it's actually possible to make the bots dive and swim
but it needs a lot of bug fixing and patience to make them NOT drown.
Buttons: The level can have buttons, but NOT floor buttons, that is, buttons on the floor.

Frogbots need zones to navigate the map
Start joequake with the following cmdline:
joequake.exe -game waypoint -condebug
The -condebug parameter is important for STEP 8
Open your map (ztndm1).
Switch to "MANUAL-MODE", then some player models should popup.
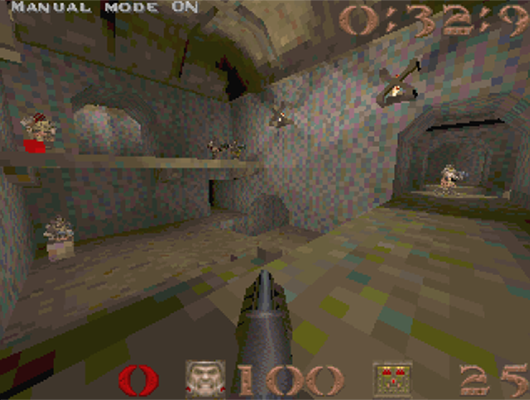
Press "TOGGLE CLOSEST-MARKER-MODE", a text should print out this message:
'TOGGLE CLOSEST MARKER ON'.
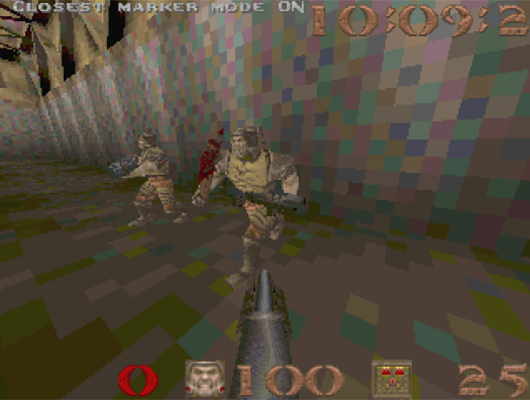
Move to some items, let's say you start by the GL. You'll see the playermodel with a axe and in
run-mode, which indicates that the item is the chosen one.
Move over to the GL, and press "DECREASE GOAL/ZONE" until you reach a message that says:
'ZONE INDEX = 1'.
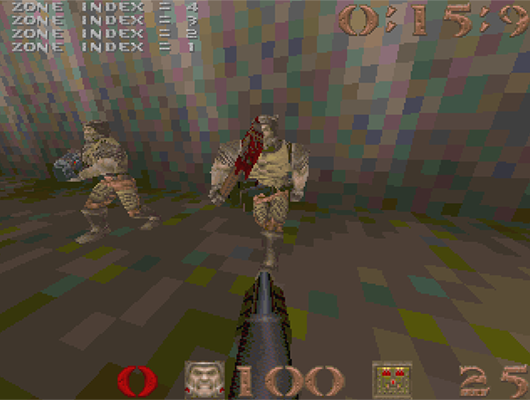
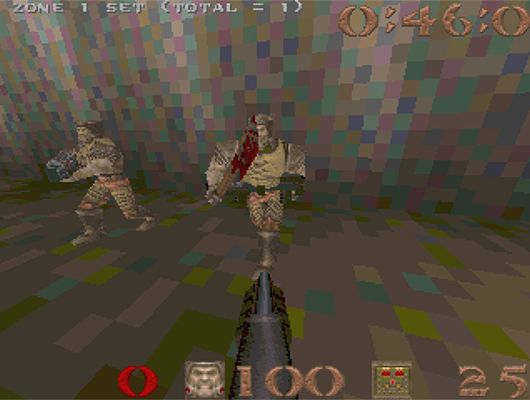
Now, hit "SET GOAL/ZONE". You'll see the message 'ZONE 1 SET (TOTAL = 1)', you has now
placed a zone in this area.
Move to the health box, and hit "SET GOAL/ZONE" again.

Give all the other items in this area 'ZONE 1'.

Then you have to place some markers. "SPAWN A MARKER".
Markers are used for the bot to navigate in the room, the markers also has to have the "Zone" of the
area.
You've created markers and zones to the first room on the map !
Well, now you have to create markers to another room.
Move to the YA/RL room, it's right next to the GL room. And make this 'ZONE 2'. And so on for the rest
of the map.

Give the items in this room 'ZONE INDEX = 2', do NOT jump down the platform, yet !
Now, all the items in this room have been 'zone'd'.
Let's place some markers here too !
Now you know how to create markers and zones on a level.
You do exactly the same on all the other places on the map.
Be aware that too many markers can cause bugs.
And be aware that too few markers can cause bugs too.
Now you're ready to move on to the next step:
Making goals (The easiest part of this tutorial !)

Let's say you stand by the GL.
Press "DECREASE GOAL/ZONES" until you reach 'GOAL INDEX = 1'.
Now press "SET GOAL/ZONE". A text should read this:
'GOAL 1 SET (TOTAL = 1)'
Translated into english:
"Goal 1 is placed on the item, and there's one "Goal 1" on the map."
Please note, that it's not a good idea to give the same goal to more than one item,
only if they are right next to each other, that is, 2 health boxes side by side etc.
I have had succes with using higher number goals for health-packs and ammo-packs
all over maps, however.

First, you should select the teleport marker (The one inside the teleport brush)
Then, give it a zone (if it hasn't one)
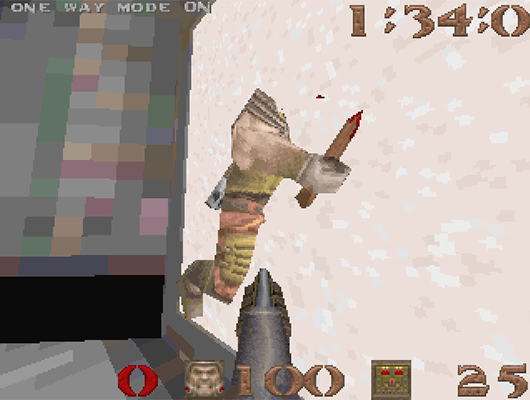
Press "TOGGLE ONEWAY-MODE" ON
Press "TOGGLE CLOSEST-MARKER-MODE" OFF
Now "TOGGLE MANUAL-MODE" OFF, you should be teleported to the
teleport destination.
Then "TOGGLE MANUAL-MODE" ON again.
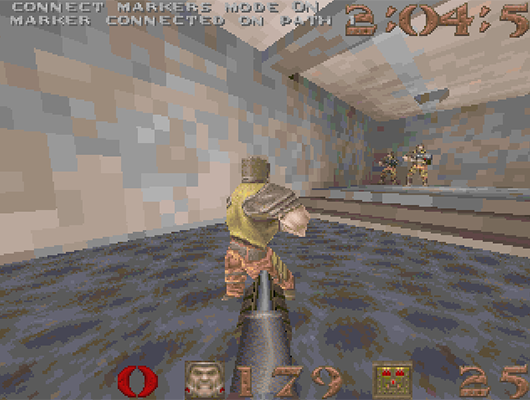
Press "TOGGLE CONNECT-MARKERS-MODE", and there... the teleport marker is connected.

Select the marker, where the bot should jump FROM.
Press "TOGGLE ONEWAY-MODE" ON
Hit 'Toggle Closest Marker OFF'
Hit 'Active marker ON'
Move to the target marker.
Hit 'Toggle Connect Markers Mode' (impulse 131), and there, now the bot will jump to the target.

Connecting markers: It's important NOT to just connect Markers random. But to think of 2 way routes between markers. A idea is to make a route through the whole map, and then make some cross points out to the goals/items. Ex. in YA on ztndm3, there could be a marker in the middle lower room floor, and that marker could be connected to YA, Stairway, LG corridor and Teleport, markers. Hit 'Default Marker Mode' (impulse 132) before making the routes, that makes sure, you are NOT using ONE WAY MODE. And then use 'Toggle Connect Markers Mode' (impulse 131) It is a good idea to use 'Toggle Closest Marker ON/OFF' to make sure the wanted marker is marked. When it's marked then, when 'Toggle Closest Marker' is OFF, you can move to the next marker and use 'Toggle Connect Markers Mode' (impulse 131). Play with it, and test the bot's movement on the map.

There is no command for saving the specific file, for the compiler. But that is why
you need -condebug in the command line. It will make a log file for all the commands
typed in the console. And save that log file to quake\joequake\qconsole.log.
When you think you're finished making the waypoints, you can save all the info by hitting
'SaveMarkers' (impulse 133). It's a good idea to do this a couple of time, to avoid loosing
all the work, if the game crashes (for testing purpose).

I use Trinca's excellent Source SRC of Frogbot 1.01. The version is now SRC379.
To add a map to this source, you simply make a map_mapname.qc file for your map. And
add it to the src379\maps\ folder. Then hit the genlist.bat. As I understand it, it will
then add your map_mapname.qc file to the right files in the source. And then you will
have to compile the qwprogs.dat, by using the fteqccgui.exe.
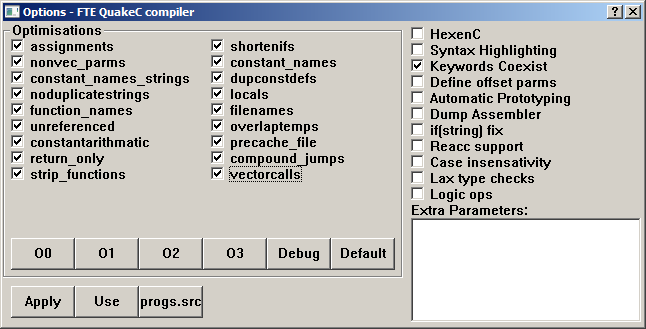
Simply just open the compiler, go to Options, press the O3 button and tick 'VectorCalls'
and press USE. And it will compile the qwprogs.dat, who you should add to the Frogbot dir.
Happy Gaming!!

Remove markers: Before using 'Remove Marker' (impulse 128) remember to 'Clear Marker' (impulse 137). You'll have to clear paths, going from the marker, and to the marker, that you want to remove. Most clients will crash if you don't do this.